Showing posts with label DIY RV. Show all posts

Wednesday, May 29, 2024

Batteries... the 24 volt Lead Acid replaced by LiFePO4.

24V EVE 230Ah 5.89kWh LiFePO4 Battery Pack Kit with Smart BMS

https://lifepo4oz.com/

is installed and Running.

Step-by-Step Guide: Setting Up Your Daly BMS with LiFePO4 Oz

 Fault : I had a flood which shut down the BMS. After it was dried out it worked again ..  I blew up the 24 to 12 volt module probably by having 12 volt on the line but zero on the 24.   Not fail safe - Beware.

The BMS also "forgets" the SOC and thinks it is 100 percent once it comes back up.

Recalibration is :          Cell Characteristics > SCO Set to 50 percent. 

Charge till 28 volts. (Not 28.6 - too high can be set         Protection parameters >sum volt high protect).

SCO Set to 100Percent.  

BMS Software           Can run on Wine (wouldnt using Synaptic) or on Google / Apps Linux

Stack Compression?   No One thinks this is necessary.

 Some assert the pile should be restrained with threaded Rod or springs .. the kits supplier thinks it is unnecessary.  If it were i would expect to see a spec in the Operating section.  The Compression Spec is in the destructive batch testing section.

The construction of the battery pack will need to be researched. There needs to be some rigidity / compression in the pack because according to some,  failing this the battery packs will swell during charge and this deformation will damage them. 

https://lifepo4oz.com/collections/lifepo4-battery-kits/products/24v-eve-280ah-lifepo4-7-17-kwh-battery-pack-kit-with-smart-bms

Compression Testing Spec  

Ref Page 19

https://batteryfinds.com/wp-content/uploads/2023/09/EVE-LF280K-280Ah-3.2V-LiFePO4-Prismatic-Battery-Cell-SpecificationDatasheet.pdf

Gives the dimensions of a test rig and then specifies the maximum pressure (swelling) the cell should exert to pass the test.  I doesnt seem to refer to the design of a working battery pack. 


Friday, May 17, 2024

Truck body work

 S&S Industries


Spray inside rust converter  .... 


Cut back 


Cold Galv ... 

I tried to use Aluminum speed tape but it was useless. Here is a Gorrilla 4 inch Waterproof tape (expensive) being used as a temporary measure to keep the Coppers from putting a Yellow Sticker (canary) on the Truck. 

The gum in the Gorrila tape is really sticky .. it will take some getting off. In retrospect I would have been better to go straight to the Fiberglass stage.  I have been driving around with the Gorilla tape for a fortnight. The truck was looking very shabby - Cop Bait.

Getting some filler and paint  on it is the next step. Choosing the paint and how to prep the existing crappy paint ... The entire cab is looking a bit forlorn.


Gonna get some new license plates too. The Old ones are faded and obviously from the 80s. 


The butyl adhesive is sticky as can be. It will be hard to remove. DONT DO  THIS .. Cover the remaining adhesive with adhesive remover or paint thinner, such as Toulene. Will try prepsol.


Friday, November 10, 2023

ESP 32 4 / 8 Relay MQTT Module.

UPDATE : 
 
I dont like the protoboard / bird's nest approach. 
 
There are 8 channel relay boards with ESP 32 available at very afffordable prices. Much nicer way to go.   30 bucks and wouldnt have to buggerise around with connectors... Just use those staright pins crimps in the screw block ... all round winner.
 
 
-------------------------------------------------------------------------------------------------------
 
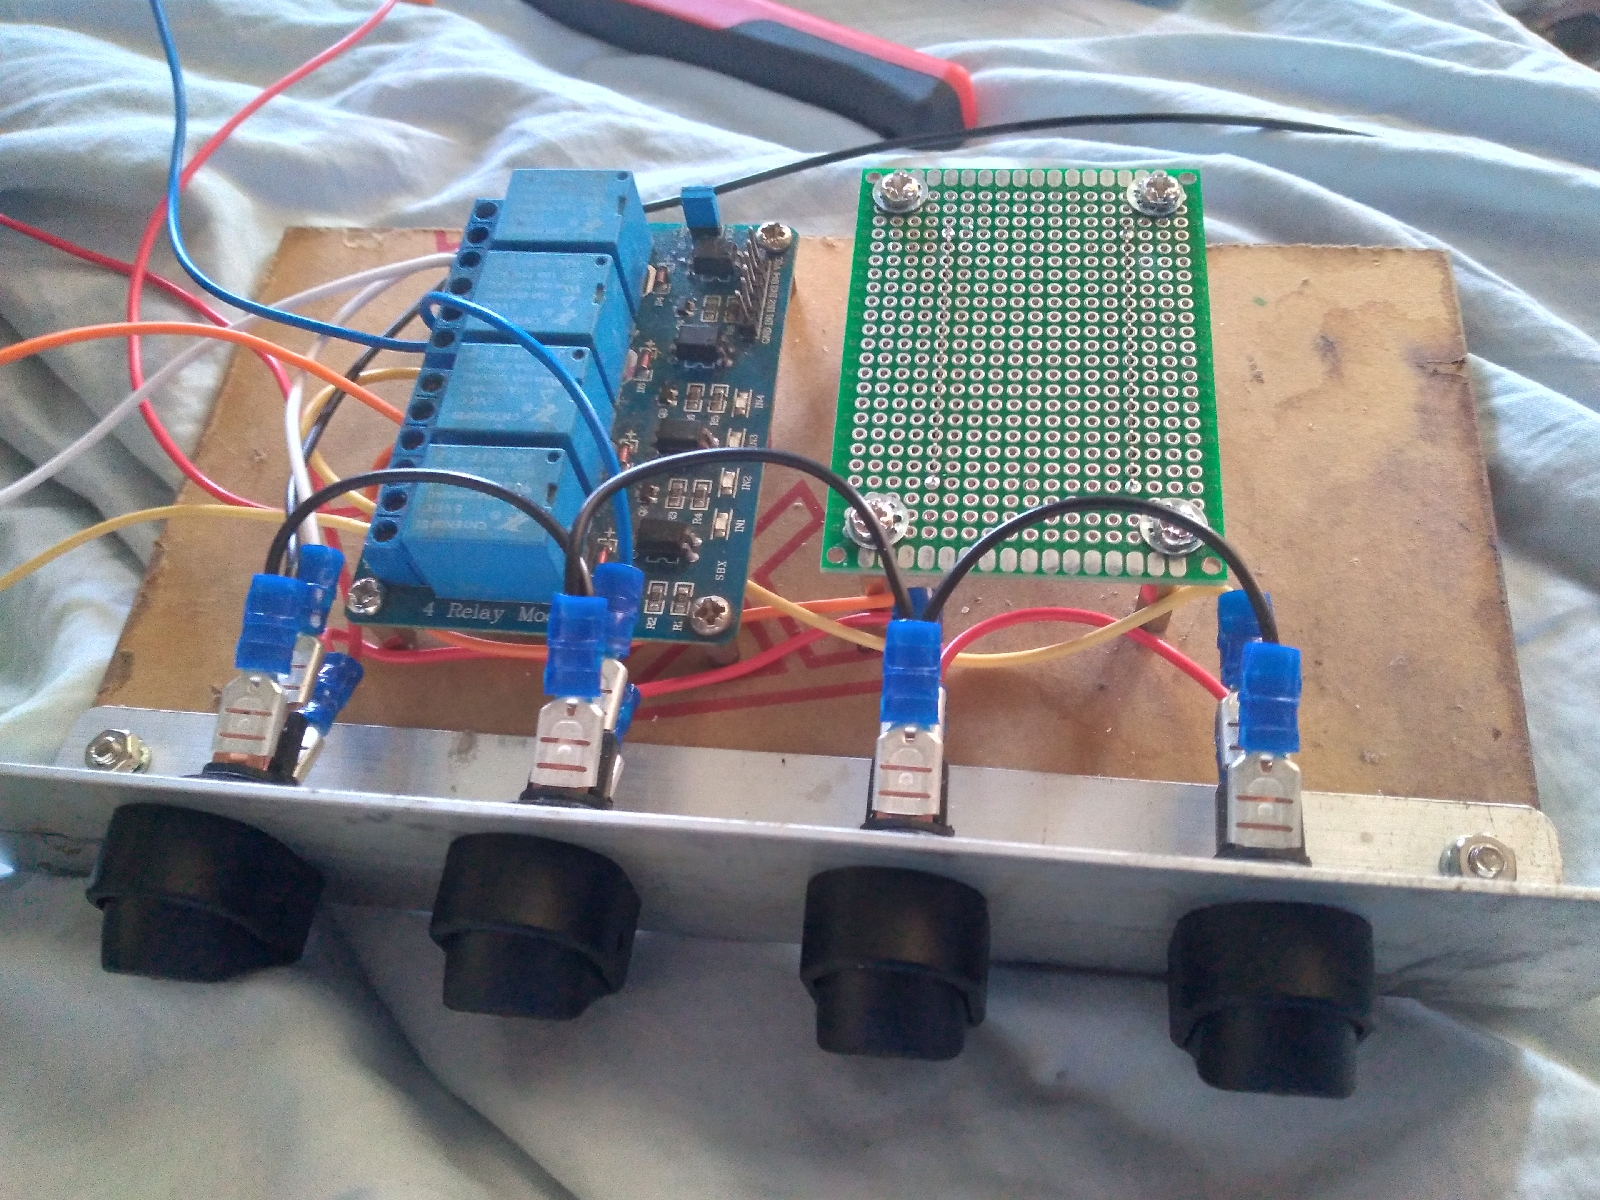
Have just built an 8 channel version of the hardware. Time to revisit the sketch and modify it for the new board. Even better make a sketch that will work on both. 

 Ref : https://randomnerdtutorials.com/esp32-relay-module-ac-web-server/

 Hacked the sketch to give three extra channels and set up a Node Red Interface ... 


/*********
MQTT Relay Driver

Rui Santos
Complete project details at https://randomnerdtutorials.com
Ref: Learning ESP32 with ArduinoIDE page 358
Modified to remove push button and to add 4 relays instead of the LED - Mark Bolton September 28 2021
*********/

#include <Arduino.h>

#include <WiFi.h>
extern "C" {
#include "freertos/FreeRTOS.h"
#include "freertos/timers.h"
}
#include <AsyncMqttClient.h>
#include <OneWire.h>
#include <DallasTemperature.h>

// Change the credentials below, so your ESP32 connects to your router
#define WIFI_SSID "Mark_Network"
#define WIFI_PASSWORD "er1amjhwif"

// Change the MQTT_HOST variable to your Raspberry Pi IP address,
// so it connects to your Mosquitto MQTT broker
#define MQTT_HOST IPAddress(192, 168, 1, 105)
#define MQTT_PORT 1883

// Create objects to handle MQTT client
AsyncMqttClient mqttClient;
TimerHandle_t mqttReconnectTimer;
TimerHandle_t wifiReconnectTimer;

unsigned long previousMillis = 0; // Stores last time temperature was published
const long interval = 10000; // interval at which to publish sensor readings

// Assign output variables to GPIO pins

const int output25 = 25; // GPIO where the Relay is connected to
const int output26 = 26;
const int output27 = 27;
const int output33 = 33;

// GPIO where the DS18B20 is connected to
const int oneWireBus = 32;
// Setup a oneWire instance to communicate with any OneWire devices
OneWire oneWire(oneWireBus);
// Pass our oneWire reference to Dallas Temperature sensor
DallasTemperature sensors(&oneWire);

void connectToWifi() {
Serial.println("Connecting to Wi-Fi...");
WiFi.begin(WIFI_SSID, WIFI_PASSWORD);
}

void connectToMqtt() {
Serial.println("Connecting to MQTT...");
mqttClient.connect();
}

void WiFiEvent(WiFiEvent_t event) {
Serial.printf("[WiFi-event] event: %d\n", event);
switch(event) {
case SYSTEM_EVENT_STA_GOT_IP:
Serial.println("WiFi connected");
Serial.println("IP address: ");
Serial.println(WiFi.localIP());
connectToMqtt();
break;
case SYSTEM_EVENT_STA_DISCONNECTED:
Serial.println("WiFi lost connection");
xTimerStop(mqttReconnectTimer, 0); // ensure we don't reconnect to MQTT while reconnecting to Wi-Fi
xTimerStart(wifiReconnectTimer, 0);
break;
}
}

// Add more topics that want your ESP32 to be subscribed to
void onMqttConnect(bool sessionPresent) {
Serial.println("Connected to MQTT.");
Serial.print("Session present: ");
Serial.println(sessionPresent);
// ESP32 subscribed to esp32/relay topic
uint16_t packetIdSub = mqttClient.subscribe("esp32/relay", 0);
Serial.print("Subscribing at QoS 0, packetId: ");
Serial.println(packetIdSub);
}

void onMqttDisconnect(AsyncMqttClientDisconnectReason reason) {
Serial.println("Disconnected from MQTT.");
if (WiFi.isConnected()) {
xTimerStart(mqttReconnectTimer, 0);
}
}

void onMqttSubscribe(uint16_t packetId, uint8_t qos) {
Serial.println("Subscribe acknowledged.");
Serial.print(" packetId: ");
Serial.println(packetId);
Serial.print(" qos: ");
Serial.println(qos);
}

void onMqttUnsubscribe(uint16_t packetId) {
Serial.println("Unsubscribe acknowledged.");
Serial.print(" packetId: ");
Serial.println(packetId);
}

void onMqttPublish(uint16_t packetId) {
Serial.println("Publish acknowledged.");
Serial.print(" packetId: ");
Serial.println(packetId);
}

// You can modify this function to handle what happens when you receive a certain message in a specific topic
void onMqttMessage(char* topic, char* payload, AsyncMqttClientMessageProperties properties, size_t len, size_t index, size_t total) {
String messageTemp;
for (int i = 0; i < len; i++) {
//Serial.print((char)payload[i]);
messageTemp += (char)payload[i];
}
// Check if the MQTT message was received on topic esp32/relay
if (strcmp(topic, "esp32/relay") == 0) {
if (messageTemp == "1on") {
digitalWrite(output25, LOW);
}
else if (messageTemp == "1off") {
digitalWrite(output25, HIGH);
}
else if (messageTemp == "2on") {
digitalWrite(output26, LOW);
}
else if (messageTemp == "2off") {
digitalWrite(output26, HIGH);
}
else if (messageTemp == "3on") {
digitalWrite(output27, LOW);
}
else if (messageTemp == "3off") {
digitalWrite(output27, HIGH);
}
else if (messageTemp == "4on") {
digitalWrite(output33, LOW);
}
else if (messageTemp == "4off") {
digitalWrite(output33, HIGH);
}
}
Serial.println("Publish received.");
Serial.print(" message: ");
Serial.println(messageTemp);
Serial.print(" topic: ");
Serial.println(topic);
Serial.print(" qos: ");
Serial.println(properties.qos);
Serial.print(" dup: ");
Serial.println(properties.dup);
Serial.print(" retain: ");
Serial.println(properties.retain);
Serial.print(" len: ");
Serial.println(len);
Serial.print(" index: ");
Serial.println(index);
Serial.print(" total: ");
Serial.println(total);
}

void setup() {
// Start the DS18B20 sensor
sensors.begin();
// Define Relay Ouput as an OUTPUT and set it LOW
pinMode(output25, OUTPUT);
digitalWrite(output25, LOW);
pinMode(output26, OUTPUT);
digitalWrite(output26, LOW);
pinMode(output27, OUTPUT);
digitalWrite(output27, LOW);
pinMode(output33, OUTPUT);
digitalWrite(output33, LOW);
Serial.begin(115200);

mqttReconnectTimer = xTimerCreate("mqttTimer", pdMS_TO_TICKS(2000), pdFALSE, (void*)0, reinterpret_cast<TimerCallbackFunction_t>(connectToMqtt));
wifiReconnectTimer = xTimerCreate("wifiTimer", pdMS_TO_TICKS(2000), pdFALSE, (void*)0, reinterpret_cast<TimerCallbackFunction_t>(connectToWifi));

WiFi.onEvent(WiFiEvent);

mqttClient.onConnect(onMqttConnect);
mqttClient.onDisconnect(onMqttDisconnect);
mqttClient.onSubscribe(onMqttSubscribe);
mqttClient.onUnsubscribe(onMqttUnsubscribe);
mqttClient.onMessage(onMqttMessage);
mqttClient.onPublish(onMqttPublish);
mqttClient.setServer(MQTT_HOST, MQTT_PORT);

connectToWifi();
}

void loop() {
unsigned long currentMillis = millis();
// Every X number of seconds (interval = 5 seconds)
// it publishes a new MQTT message on topic esp32/temperature
if (currentMillis - previousMillis >= interval) {
// Save the last time a new reading was published
previousMillis = currentMillis;
// New temperature readings
sensors.requestTemperatures();

// Publish an MQTT message on topic esp32/temperature with Celsius degrees
uint16_t packetIdPub2 = mqttClient.publish("esp32/temperature", 2, true,
String(sensors.getTempCByIndex(0)).c_str());
// Publish an MQTT message on topic esp32/temperature with Fahrenheit degrees
//uint16_t packetIdPub2 = mqttClient.publish("esp32/temperature", 2, true,
// String(sensors.getTempFByIndex(0)).c_str());
Serial.print("Publishing on topic esp32/temperature at QoS 2, packetId: ");
Serial.println(packetIdPub2);

}
}


Tuesday, January 5, 2021

Rewiring Truck.

 This time I am wiring it up using toggle switches initially. 

I will attempt to use two or more ESP32 / Relay combos to "Smart" the system as plug in modules. 

Th speaker system also needs replacing. Blue tooth was annoying at times but mostly very stable. I will likely use the module with the 3.5 mm phono from the back of the monitor so as not to need bluetooth at all. 

 https://www.banggood.com/50W+50W-TDA7492-CSR8635-Wireless-bluetooth-4_0-Audio-Receiver-Amplifier-Board-NE5532-Preamp-p-1109777.html?rmmds=myorder&cur_warehouse=CN

Still waiting on components from Banggood as is usual with them. 

Friday, November 6, 2020

ESP32 Temperature and Humidity Webserver

 Ref: https://randomnerdtutorials.com/esp32-dht11-dht22-temperature-humidity-web-server-arduino-ide/


Finally got some action here. 

Used a very hygenic and time consuming approach in getting the Arduino IDE to tame out. I had a typo in the path of the damn thing and couldn't seem to get rid of it. It kept on bringing up dud links on the launcher and I decided to burn the OS install just to be sure of ironing out the kinks. Brutal but effective and ultimately a pragmatic use of time. 


Sunday, May 31, 2020

Solar Panels Installed.


1.5 kW of panels installed. Overkill on the solar perhaps but it barely suffices in overcast locations. Jn Melbourne on a Partly Cloudy day in June the Controller is Metering 1 - 2 kWh/day. This is not really enough to run anything but rather just stops the batteries running flat. 

Update : Note the woefully inadequate mounting hardware on the solar panel roof fasteners. The rearmost offside panel has been replaced where that one panel flew off. More brackets were added to fasten down the inboard section. (Not shown) ..


240w-250w panels - about 1650mmx1000mm


Replacing missing panel and reinforcing the mounting hardware on the rest.


Interior Views

 Work bench.


 Workbench.
Top Right partially built control box for hass.io

Saturday, May 23, 2020

Ultrasonic Water Level / Temp / Humidity Sensor


Project will measure the level of water in my 300 Litre tank and the Temp Humidity in the Boltonwagen. 


Sensors:

JSN-SR04T-2.0 

AM2302 DHT22 Temperature And Humidity Sensor Module For Arduino SCM

Specification:

Electrical properties:
Operating voltage: DC 5V
Total current work: 40mA
Acoustic emission frequency: 40khz
Farthest distance: 4.5m
Blind: 25cm

Resolution: about 0.5cm
Angle: 70 degrees
Working temperature: -10 ~ 70 ℃
Storage temperature: -20 ~ 80 ℃

 
Wiring:

 
+ 5V (positive power supply)                  RD
Trig (control side) RX                D 11     WH
Echo (the receiver) TX               D 12     GY
GND (negative)                                       BLK

Principle of Operation:


(1) using IO port TRIG trigger location, to the high level signal of at least 10us;
(2) module automatically sends 8 40KHz pulse, automatic detecting whether a signal return;
(3) a signal return, a high level is output through the IO port ECHO, the time duration of the high level is
ultrasonic from launch to return. The test distance = (high level time * speed of sound (340M/S)) /2;


Software & Refs :

Library for  Ultrasonic Sensor

https://github.com/daPhoosa/MedianFilter


https://www.youtube.com/watch?v=wb0sTy_26XM&ytbChannel=null 

http://www.ardumotive.com/how-to-use-dht-22-sensor-en.html#


https://www.banggood.com/DC-5V-Waterproof-Ultrasonic-Module-Distance-Measuring-Transducer-Sensor-p-1094462.html


Tank Dimensions:

W 2109 x D  185 x H 770 (Measured Dimension)   300 Litres

____________________________________________________________

/* How to use the DHT-22 sensor with Arduino uno
  ---------------------------------------------------------------------------
 Project will measure the level of water in my 300 Litre tank and Temperature and humidity.
---------------------------------------------------------------------------
   More info: http://www.ardumotive.com/how-to-use-dht-22-sensor-en.html
   Dev: Michalis Vasilakis // Date: 1/7/2015 // www.ardumotive.com

 Mark Bolton
 7 September 2018

 Two sketches are combined.   //water   and  //temp

  */
 
//Libraries

#include <dht.h>        //temp
#include <NewPing.h>      //water
#include <MedianFilter.h>
#include <Wire.h>


#define TRIGGER_PIN  12  // Arduino pin tied to trigger pin on the ultrasonic sensor.
#define ECHO_PIN     11  // Arduino pin tied to echo pin on the ultrasonic sensor.
#define MAX_DISTANCE 800 // Maximum distance we want to ping for (in centimeters). Maximum sensor distance is rated at 400-500cm.

dht DHT;

//Constants
#define DHT22_PIN 8     // DHT 22  (AM2302) - what pin we're connected to

//Variables
float hum;  //Stores humidity value
float temp; //Stores temperature value

int tank_Depth = 18;                    // Tank Depth (cm)
int tank_Width = 211;                   // Tank Width (cm)
//int US_ROUNDTRIP_CM;                  // Tank Height (cm) from sensor.
int water_Volume;                       // Amount of water in the tank. (Litres)


NewPing sonar(TRIGGER_PIN, ECHO_PIN, MAX_DISTANCE); // NewPing setup of pins and maximum distance.

MedianFilter filter(31,0);

void setup()
{
    Serial.begin(9600);
}

void loop()
{
    int chk = DHT.read22(DHT22_PIN);
  
  //Read data and store it to variables hum and temp
    hum = DHT.humidity;
    temp= DHT.temperature;

    
  delay(100);                          // Wait 50ms between pings (about 20 pings/sec). 29ms should be the shortest delay between pings.
  unsigned int o,uS = sonar.ping();   // Send ping, get ping time in microseconds (uS).

  filter.in(uS);
  o = filter.out();
  
  //Print temp and humidity values to serial monitor
  Serial.print("Hum: ");
  Serial.print(hum);
  Serial.print(" %, Temp: ");
  Serial.print(temp);
  Serial.print(" C. ");

  //Print level and Volume to monitor
  Serial.print("Level: ");
  Serial.print( o / US_ROUNDTRIP_CM);
/* Convert ping time to distance in cm and print result (0 = outside set distance range)*/
  Serial.print("cm.");

/* calculate volume .001 to convert to Litres / cm. * D * W * H (77) - distance from surface of the water to the sensor. */
 
  water_Volume = 0.001 * tank_Depth * tank_Width *  77 - o / US_ROUNDTRIP_CM;
 
  Serial.print(" Vol: ");
  Serial.print(water_Volume);
  Serial.print(" L");

// CSV file
  Serial.print("  ");
  Serial.print(hum);
  Serial.print(",");
  Serial.print(temp);
  Serial.print(",");
  Serial.print( o / US_ROUNDTRIP_CM);
  Serial.print(",");
  Serial.println(water_Volume);


}

Problem. dht.h not a valid library. I removed all DHT Libraries and reinstalled the  zip file included in the tutorial.

I built a replica Prototype Unit to clean up the code and get some more sensors and setup a proper Python controller in the Pi but none of the Sketches would verify. I cant identify the issue but clearly it is a problem with the Libraries. The best approach under these circumstances is to go back to scratch and set up the system again.

Fixed. Just gradually rebuilt the other few libraries and now the Water Level Sketch works too.

BUT : Pulled the unit to bits (for unrelated reasons) and will revisit later... 

Might want to double check the formula on the  Height to Volume calculation.

The Heater Fuel Sender needs monitoring as well.